

Step-by-step instructions for making Half Drilled Pearl Beads Earrings made using common jewelry tools out of jewelry findinga and common jewelry supplies:
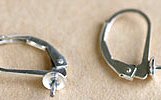
Step 1: Assemble the components. You will need two 1/2 drilled pearl beads in 6mm or 8mm size, one pair of the appropriate finding for setting the size beads you choose and a pair of ear clutches. In the close-up picture below-right, you can view the finding so that you can see both the cup and the post. For 6mm beads, a sterling silver finding is Item 3289 and a gold-filled finding is Item 3290. For 8mm beads a sterling silver finding is Item 3287 and a gold-filled finding is Item 3288. You can view our select of 1/2 drilled pearl beads from the link above-right.
 |
Step 2: Using a nail file, or a jeweler's file, file the area around the hole in the bead. The manufacturing process results in a small amount of the pearl coating on the bead accumulating around the hole in the bead. You will want to file this area until it is smooth and flat with the rest of the surface of the bead. This should take about 10 -20 seconds of filing.
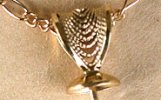
Step 3: Now place a WigJig jewelry tool face up on a table and set the long post from your finding into one of the holes in your WigJig. As you can see at right, this holds the finding in position so that you will be able to easily apply glue to the shorter post within the cup. The post itself has grooves that will help the glue to grip the metal. Using GS-Hypo Tube Cement or similar glue, coat the short post and a small area around the post with glue. Be careful that you don't apply too much glue, just enough to thoroughly coat the post and the area around the base of the post. To spread the glue evenly you may want to rotate the finding with one finger as you apply the glue with the opposite hand.
Step 4: Slide your 1/2 drilled pearl bead onto the post. Press down gently. Allow to dry for about 30 minutes. Leave the earring upright in your WigJig jewelry tool as the glue dries.
 Step 5: The final step, after your glue has completely dried, is to add your butterfly style ear clutch. Now your earring is ready to be worn.
For those of you who make and sell jewelry, this is an excellent project where you can purchase the supplies to make these earrings for less than $5 and make a pair of earrings in less than a minute. Our opinion is that these earrings should sell well at prices less than $10. We believe that having a low priced item like these earrings can get shoppers to stop and view your merchandise and therefore will also help to sell your more expensive merchandise. These earrings also make great presents!


RELATED VIDEO


Share this Post
latest post
-
 Fabric beads · How To make? June 11, 2026
 -
 Custom Handmade beaded jewelry May 22, 2026
 -
 Handmade Rosary beads May 2, 2026
 -
 Things to make with beads April 12, 2026
 -
 Easy to make Beaded bracelets March 23, 2026
 -
 Handmade glass beads March 3, 2026
 -
 Making Keychain with beads February 11, 2026
 -
 Make Polymer Clay beads January 22, 2026
 -
 Making copper wire Jewelry January 2, 2026