 Since last weeks project was beyond simple… I decided to flex my DIY muscles – so beware, this project is not for the beginner! This very detailed, step by step tutorial shows how to create a multi-strand statement necklace, perfect for the hardcore DIY bride! Bold jewelry has become quite the rage, so take this trend by it’s horns and create something no other bride will have – a necklace fit only for you, the DIY Wedding Queen…
SUPPLIES:
- your choice of beads, lots of pretty beads
- wire cutters, small pliers, and crimp pliers
- soft flex beading wire
- 18 crimp beads
- 26 open jump rings
- two 9 hole end bars
- large toggle clasp
- tape
- felt (or the like)
I recommend using at least 5 different strands of beads if not more, here I chose 7. From left; aqua seed beads, white potato fresh water pearls, turquoise glass beads, crystal chain, 8mm round Amazonite, faux-matte glass pearls, and sage fresh water pearls.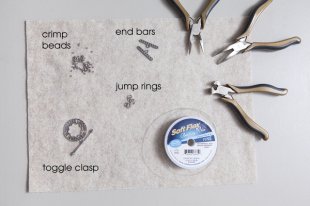 To recreate this look you need to choose strands of different color and texture. I like working on a piece of felt or material so stray beads don’t roll around on me.
Measure your neck to see how long your necklace should be. I made mine 17″.
Start by cutting your Soft Flex wire, add at least 8″ to your neck measurement… you will need extra wire to work with while beading. Cut 9 wires; one for each end bar hole.
***There are many different ways you could assemble this necklace; here I tried to break the steps down and make them simple – but do what you feel comfortable with.
Start by adding jump rings to your end bars; these will hold all your bead strands. Make sure to completely close each jump ring with your pliers. Complete both end bars.
 The next step is to form a jump ring chain to add each piece of the toggle clasp to each end bar. I added 4 jump rings to this connection to add length for ease of operating the clasp.
Now, plan out your strands. I chose 7 different beads, but I needed 9 strands – so I doubled up on the amazonite and the faux glass pearls. Pick your pearly poison.
Now add each of your cut pieces of Soft Flex to one end bar.
Do this by threading the Soft Flex with a crimp bead, then thread the Soft Flex through one jump ring and back through the crimp bead, crimp the crimp bead with a pair of pliers, and tug to make sure it’s secure. ***The first picture is only showing the Soft Flex threaded through the crimp bead twice.


RELATED VIDEO


Share this Post
latest post
-
 Handmade paper beads July 21, 2026
 -
 Who makes Pandora Jewelry? July 1, 2026
 -
 Fabric beads · How To make? June 11, 2026
 -
 Custom Handmade beaded jewelry May 22, 2026
 -
 Handmade Rosary beads May 2, 2026
 -
 Things to make with beads April 12, 2026
 -
 Easy to make Beaded bracelets March 23, 2026
 -
 Handmade glass beads March 3, 2026
 -
 Making Keychain with beads February 11, 2026