Step-by-step instructions for making Wire Chandelier Earrings using WigJig jewelry tools, jewelry wire, beads and common jewelry supplies:
Step 1: Cut and straighten a three inch piece of 20G round, 1/2 hard jewelry wire. (Soft jewelry wire can be used, but the design works better in 1/2 hard jewelry wire because the loops around the pegs are tighter.
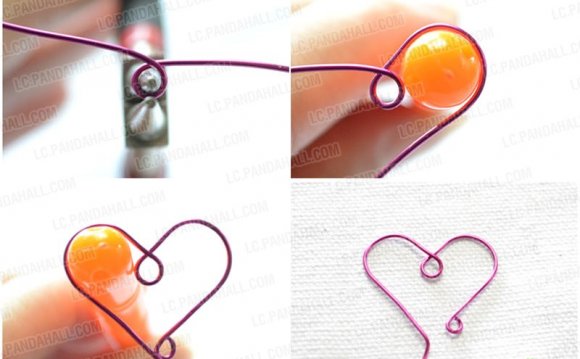
Step 2: Make a loop in one end of the jewelry wire.
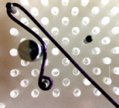
Step 3: Position the pegs in your WigJig jewelry tool as shown at right. This pattern is for the Cyclops or Electra jewelry tool. A similar pattern using the 45 degree angle can be made on the Delphi or Olympus/Olympus-Lite jewelry tool.
Peg Pattern for WigJig Cyclops
Step 4: Place the loop in the 20G jewelry wire on one of the end pegs in the pattern on your WigJig jewelry tool and wrap the wire as shown above right. This pattern works best if you wrap from one end of the "V" to the center, completing the center loop, then remove the jewelry wire from the jewelry making jig and flip it over, replacing it on the opposite side of the "V". Now finish the wrap up the other side of the "V". This will make a more symmetrical wire component.
Step 5: Remove the wire from the WigJig jewelry tool and cut the excess wire at the end with your flush cutter. Close the final loop using your bent chain nose pliers.
Step 6: Squeeze the jewelry wire component in the jaws of Nylon Jaw Pliers in several different orientations to harden the piece, set the shape and make the wire as two dimensional as possible.
|
Step 7: Open the initial and final loops and add a segment of chain about 1 to 1/12 inches long. Count the links and be sure to have an odd number of links in the chain. Be careful about the orientation of the links. Make sure that the chain is not twisted. |
 Step 7
 |
|
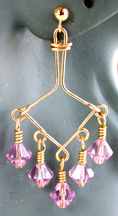
Step 8: Thread five head-pins onto five beads. For these earrings I used 4mm Swarovski Bicone Crystal Beads. (6mm beads could also have been used with a 2.5 mm metal bead instead of the 4mm beads. If you use 6mm beads you will need the additional metal bead so that the beads hang down far enough to hang straight.) Make a wrapped bead dangle and hang one of the 4mm beads from each loop in the wire component. |
Step 9: Add an ear wire. Connect the ear wire to the middle link in the chain. Watch the orientation of the chandelier wire component. You may need to orientate the loop in the ear wire so that the chandelier hangs properly. This can be done by twisting the loop in the ear wire 90 degrees, or by adding a figure 8 connector so that the "chandelier" hangs properly.
Step 10: To complete this jewelry making project, make a second earring using the same steps.
|
Alternative designs for making earrigns using WigJig jewelry tools: The peg pattern shown at right is the pattern for the Delphi, Olympus or Olympus-Lite jewelry making tools. The wire component that this makes is slightly different than the design shown on the WigJig Cyclops jewelry tool. |
Pattern for Delphi or Olympus Jewelry Tools |
|
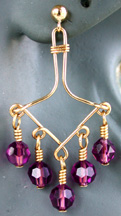
The Earrings made using this pattern have a design that is closer to a square held by one corner. When making these earrings I try to size the amount of wire so that each side of the wire is the same length as each side of the "V" shaped wire component. The earrings shown at right use 6mm Swarovski Bicone crystals and 2mm gold-filled round metal beads. The extra length that results from using these beads allows the 6mm beads to hang straight.
|
 More alternative designs follow.
|
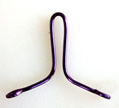
More alternative designs for making earrings using WigJig jewelry tools: These alternative designs replace the chain in the Chandelier Earrings with a jewelry wire component made on on your WigJig jewelry tool. These earrings are made from two wire components. The first component is the V shaped wire component made on the WigJig Delphi jewelry tool. The second component is the jewelry wire component that is used to connect the V shaped component to the ear wire finding. When combined these two wire components look like a shovel. The second wire component, we will call the handle, since it is the handle portion of the shovel. Instructions for making these components are provided below. These directions are slightly abbreviated. |
|
|
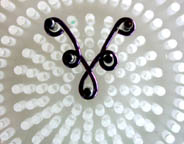
The peg pattern on our WigJig jewelry tool for making the V shaped wire component is shown at right. To make this component, cut and straighten a 2 3/4" piece of jewelry wire (preferably 1/2 hard). Make a loop on one end of this wire. Place your initial loop over peg 1. Remove peg 3 from the jewelry making jig and wrap your jewelry wire around peg 2. Push the wire far enough so that it would rest against peg 3 if it were there. Now replace peg 3 and remove pegs 4 and 5. Wrap the jewelry wire around peg 3 so that it would rest against peg 4 if it were there. Replace pegs 4 and 5. Remove the wire from the WigJig jewelry tool and re-place it on the jewelry making jig in the mirror image position, with the initial loop on peg 5, but with the loop formed on peg 3, still on peg 3. Now remove peg 1 and make a loop around peg 2 with your wire. Make sure to push the jewelry wire far enough that it would rest against peg 1 if it were there. Finally, replace peg 1 and wrap the wire around this peg. Cut the excess wire tail and you are done with the V shaped component. |
 V-Shaped Wire Component
Pattern on WigJig Jewelry Tool |
|
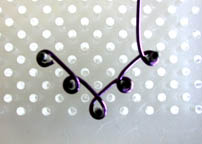
Now we need to make the handle to the shovel. Step 1: Position two 3/16" Super Pegs and three metal pegs in your WigJig Delphi jewelry tool as shown at right. Step 2: Cut a 2 1/2" piece of 20 g jewelry wire (preferably 1/2 hard). Step 3: Make a loop in one end of this jewelry wire and straighten the wire. Holding onto the loop will help to straighten the jewelry wire. |
Step 1 |
|
Step 4: Remove peg 4 from the WigJig jewelry tool and place your initial loop on peg 1. Bend the jewelry wire against peg 2 as shown at right. When you are done, the wire should rest against peg three, only barely touching this peg. If the jewelry wire is tight against peg 3, push the wire further against peg 2 until it is just barely touching peg 3. |
Step 4 |
|
Step 5: Now wrap the jewelry wire around peg 3 in your WigJig jewelry tool. When you are completed, the jewelry wire needs to rest so that peg 4 can be replaced and the wire will just barely touch peg 4. If the wire is tight against peg 4, push it some more. |
Step 5 |
|
Step 6: Now add peg 4 back onto the WigJig jewelry tool and bend the wire against peg 4 as shown at right. Again, when you are done, the jewelry wire should rest lightly against peg 5. |
Step 6 |
|
Step 7: Wrap the jewelry wire around peg 5 as shown at right. |
Step 7 |
| Step 8: Remove the jewelry wire from the WigJig jewelry tool and cut the excess jewelry wire off. Remember to cut with the flat side of your flush cutters toward the finished piece. After cutting the excess wire, close the loop that you just completed. Your handle wire component should appear as shown at right. |
Step 8 |
|
Step 9: Now using your round nose pliers. Grasp the loop on either end of the handle wire component and When done, the handle should appear as shown at right. |


RELATED VIDEO
Share this Post
latest post
-
 Fabric beads · How To make? June 11, 2026
 -
 Custom Handmade beaded jewelry May 22, 2026
 -
 Handmade Rosary beads May 2, 2026
 -
 Things to make with beads April 12, 2026
 -
 Easy to make Beaded bracelets March 23, 2026
 -
 Handmade glass beads March 3, 2026
 -
 Making Keychain with beads February 11, 2026
 -
 Make Polymer Clay beads January 22, 2026
 -
 Making copper wire Jewelry January 2, 2026